 This is the part 2 or the “SHA2 SSL certificate with trusted Apache web server” post. You have to follow it before. See step 1 to 3 here.
Part 4 – Configure apache server for SSL
Here I am using the default site name for apache, but you may have already yours, in that case just change to the correct and replace /etc/apache2/sites-available/default by the correct one.
Edit the following file : /etc/apache2/sites-available/default, update the virtual host content with the following informaiton :
<VirtualHost *:443>
    ServerAdmin webmaster@localhost
    DocumentRoot /var/www
################################################
###  Default directories
################################################
    <Directory />
            Options FollowSymLinks
            AllowOverride All
    </Directory>

    ScriptAlias /cgi-bin/ /usr/lib/cgi-bin/
    <Directory "/usr/lib/cgi-bin">
            AllowOverride All
            Options +ExecCGI -MultiViews +SymLinksIfOwnerMatch
            Order allow,deny
            Allow from all
    </Directory>


################################################
###  SSL settings
################################################
ServerName domain
SSLEngine On
SSLCertificateFile /etc/apache2/cert/server.crt
SSLCACertificateFile /etc/apache2/cert/ca.crt
SSLCertificateKeyFile /etc/apache2/cert/server.nopassphrase.key

################################################
###  Mains directory seting
################################################

<Directory /var/www/>
#   From the Internet only HTTPS + Strong-Cipher + Password
#   or the alternative HTTPS + Strong-Cipher + Client-Certificate
#   If HTTPS is used, make sure a strong cipher is used.
#   Additionally allow client certs as alternative to basic auth.
    SSLVerifyClient      optional
    SSLVerifyDepth       1
    SSLOptions           +FakeBasicAuth +StrictRequire
    SSLRequire           %{SSL_CIPHER_USEKEYSIZE} >= 128
    #   Allow Network Access and/or Basic Auth
    Satisfy              all

    #   HTTP Basic Authentication
    AuthType             basic
    AuthName             "Protected Intranet"
    AuthBasicProvider    file
    AuthUserFile         "/path/to/htpasswd/.htpasswd"
    Require              valid-user
</Directory>


# Possible values include: debug, info, notice, warn, error, crit,
LogLevel warn
ErrorLog ${APACHE_LOG_DIR}/rproxy_error.log
CustomLog ${APACHE_LOG_DIR}/rproxy_access.log combined

</VirtualHost>
Of course you have to change path to your AuthUserFile and replace with the correct path. if file do not exist yet you can create it for example under /etc/apache2/secure_dir.
Step 5 : update AuthUserFile and restart Apache
This step is mandatory if you don’t want user to be asked for password if they have already a client certificate.
Download and execute the following file (see here the content) :
cd /etc/apache2/cert
curl -o https://raw.githubusercontent.com/Sirus10/SSL-Raspberry-Apache/master/export_cert_to_AuthUserFile.sh
chmod +x ./export_cert_to_AuthUserFile.sh
./export_cert_to_AuthUserFile.sh
The line display have to be added into your AuthUserFile, just copy/paste the line as there are in the file using vi.
Now it is time to restart your apache server, you can do like that :
/usr/sbin/apache2 restart
Step 6 : Installing the certificates on your Browser
Using filezila (or any fpt transfer tool) you have now to download the 2 files : ca.cert and client.p12 on your pc. Then double click on ca.cert and select :
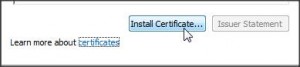
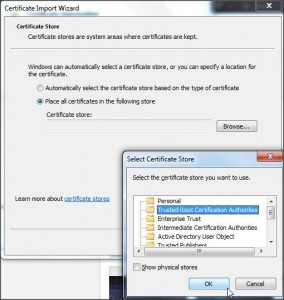
And click Ok and next… You will have the confirmation that the new autority certicicate is installed.
Now you have to install your client certificate : clic on client.p12 and follow the insctruction (keep all default selections), if you fallowed the step 2 correctly there is no need for password.
(these two steps have to be done on all bowser and PC you want to securely acces to your server)
Then it is completed, you can restart your bother (completely not only the tabs) and try to logon you server using https://you_url.someting…
You shoudl be prompted to use client certificate (the one you craete at step 2) and you shoudl see green padlock :

That all, if you complete all these steps you have a secure ssl SHA2 autentified connection from your brother (anywhare in the world) to your apache server.
I hope you will enjoy this tutorial, put a coment if you have question/ issue , i will try to help as mush as I can.
Ps: this mzthod is working well with chrome and internet explorer. To install the cert on firefox there is a diifferent method, I will try to provide it later..